Workflow Management Tool Documentation
Introduction
The Workflow Management Tool (WMT) is a component of the ASAP system architecture. It is used for workflow creation, modification, analysis and optimisation. WMT provides a GUI for workflow design. The model underlying WMT combines simplicity of expression of application logic and adaptation of the level of description of execution semantics. It enables the separation of task dependencies from task functionality. In this way, WMT can be easily, i.e. intuitively and in a straightforward manner, used by many types of users, with various levels of data management expertise and interest in the implementation. The workflow and the including tasks are described using a JSON-based metadata language. The workflow is analysed and the result of the analysis can be a list of detected errors of a workflow or an analysed workflow which is actually an enhancement of the initial workflow with more vertices, substitution of vertices and/or edges in the initial workflow with others, and addition of metadata to the tasks. WMT is a fully open-source instrument that includes the designing interface, as well as analysis and optimisation modules.
Workflow Representation
In WMT, a workflow is represented in a single JSON file. This representation captures structural information, design metadata (e.g., functional and non-functional requirements, physical characteristics like resource allocation), operator properties (e.g., type, schemata, statistics, engine and implementation details, physical characteristics like memory budget), and so on. The first levels of the metadata tree of the workflow are the following:
- Nodes Each node contains a list of task IDs which belong to this node.
- Edges This is a list of pairs of node IDs - (sourceId, targetId). An edge defines the flow of data from one vertex to another. These nodes are called the source and the target, respectively.
- Tasks This part contains a list of task meta-data. The task meta-data consists of the information that is used to match abstract and materialized operators and datasets and the ID of a node to which this task belongs.
- TaskLinks (optional) This part contains links between tasks lying within a single node.
Workflow Functionality
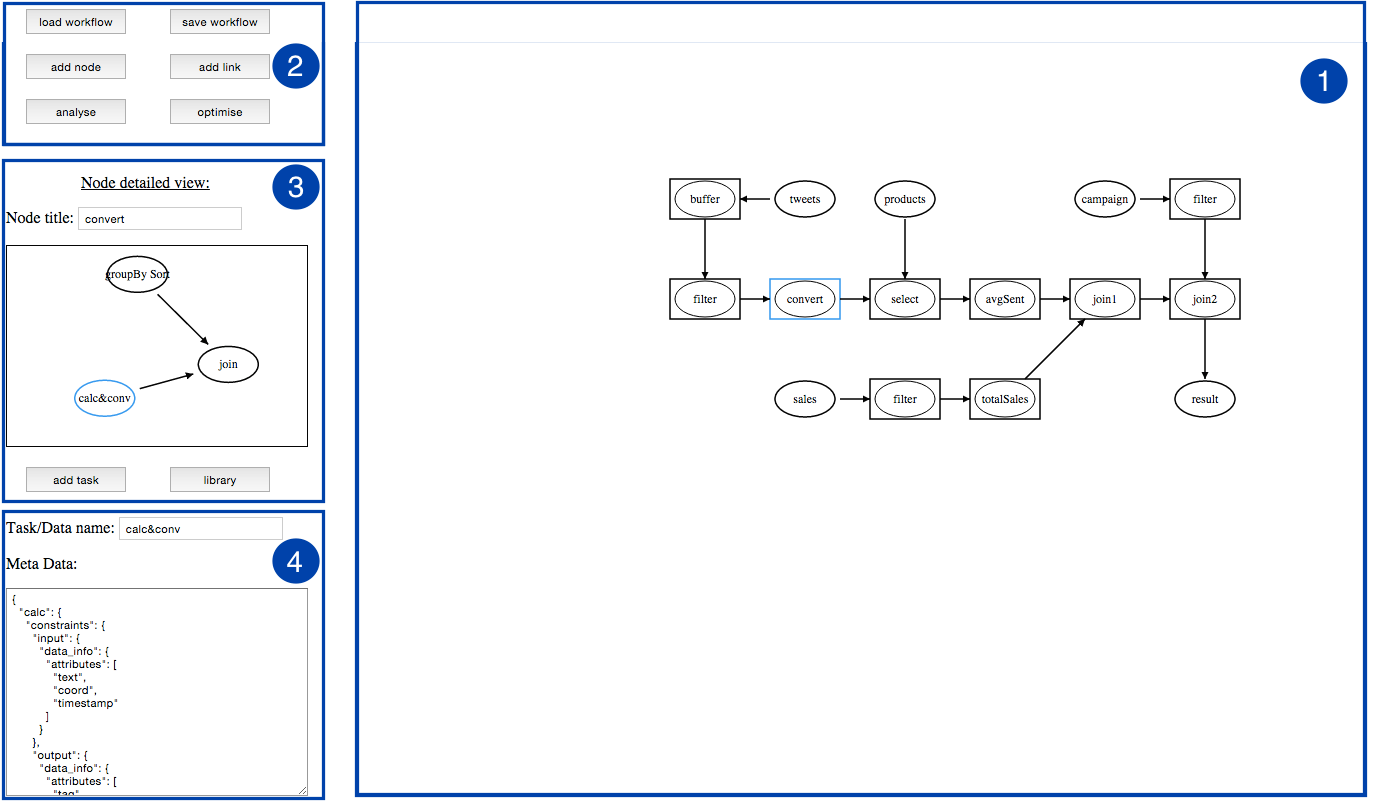
WMT provides a GUI to enable users to design workflows and perform analysis and optimization. The GUI consists of several areas that perform the following functions:
- Display the workflow (Area 1).
- Add nodes and edges (Area 2). This process depicted in the figure above. First, the user adds a node, then she adds two tasks in it from the operators library, and finally she connects nodes and tasks.
- Create a new workflow from scratch, save and load it.
- Perform workflow analysis or optimization.
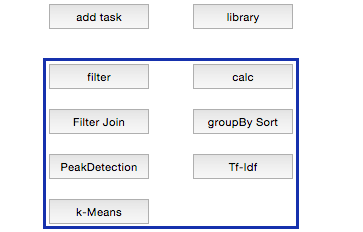
- Add tasks from a library (see the figure below) or create new ones (Area 3). If the user adds a task from a library then it is accompanied by a set of metadata, i.e., properties that describe them. If a new task is created then the first levels of the metadata tree are predefined but users can add their ad-hoc subtrees to define their custom data or operators.
- Display metadata of the selected task (Area 4).
Link
The code of the WMT can be found in: <https://github.com/project-asap/workflow.git>
Install
For demostration reasons a Linux operating system like Ubuntu it is assumed in this step. In Windows or other Linux distributions the equivalents should be done.
The installation instructions are the following:
- Install nginx, php-fpm, npm and python packages. Execute the command:
sudo apt-get install nginx php-fpm npm python
- The project’s root directory stores a configuration file for nginx: wmt.conf.default. It should be changed appropriately: on line 5 set $ROOT “/your/path/to/wmt”;. Then you can use this file for nginx server configuration:
ln -s ~/your/path/to/wmt/wmt.conf /your/nginx/installation/servers/ (where nginx server is installed.)
- Install the Grunt’s command line interface (CLI) globally can be done with the following commands:
sudo npm install -g grunt-cli
- Start nginx:
sudo service nginx start
- Point your browser to the node where WMT is running. Default installation is at http://localhost:8888/
Tests
To run tests:
python -m unittest -v testmain
in the directory pub/py/
Currently, the following functions have test coverage:
- analyse() - comparison of its result with the presaved result in a file testwl-a.json
- save() - checking that save function generates a file with correct name
- execute() - checking that execute function saves a workflow in IReS format (correct folder and presence of required files in it)
- findNode() - checking that found node with findNode function has correct id
- findTask() - checking that found task with findTask function has correct id
- findEdge() - checking that found edge with findEdge function has correct id
- dict2text() - comparison of its result with the presaved result
Design a workflow
Creating a workflow from scratch can be done by following steps:
- Click new workflow button on the top of the page and provide a name.
- Create a graph of a workflow. Add datastore using the buttons add datastore.
- Add a new task for datasets, selecting among the existing datasets that are defined in IReS.
- Add a node, using the add node button.
- Add a task for the abstract workflow, selecting among the existing abstract workflows that are defined in IReS.
- Add a datastore
- Add a task for the final abstract datastore.
- Connect the initial datastore to the abstract workflow, using button add links, when it is pressed сlicking on the first then the second nodes adds an edge between them.
- Connect the abstact workflow to the final datastore.
- Press upload workflow.
- The workflow should appear in the IReS abstract workflow tab. If there are materialized operators the workflow should be able to be materialized and execute in IReS.